# vm create -t centos7 -s 30g bq-5209r-7.7

# vim /vm/bq-5209r-7.7/bq-5209r-7.7.conf
loader="grub" # uefi じゃないので graphics 対応がない。text mode (CUI) インストーラになる。

xhci_mouse="yes"
cpu=2
memory=2G

network0_type="virtio-net"
network0_switch="public"
disk0_type="virtio-blk"
disk0_name="disk0.img"

# CDブート時のメニューは (cd0)/isolinux/isolinux.cfg に記述されている。
# これを読んでメニューを出すことは出来ないので、選んだ際に実行される内容を下に埋め込むことにする。
# 下は expert 相当
grub_install0="linux (cd0)/isolinux/vmlinuz inst.ks=hd:LABEL=BlueOnyx-5209R-x86_64:/ks/kick_self.cfg initrd=initrd.img inst.stage2=hd:LABEL=BlueOnyx-5209R-x86_64 rd.live.check quiet net.ifnames=0 biosdevname=0"
grub_install1="initrd (cd0)/isolinux/initrd.img"
grub_install2="boot"

# インストール後の (hd0,msdos1)/grub2/grub.cfg
grub_run_dir="/grub2"

# vm install -i bq-5209r-7.7 ~/BlueOnyx-5209R-CentOS-7.7-20200116.iso
grub
5210R と違って UEFI に対応していない。(UEFIブートできるが非対応のメッセージが出て、中断する)
CentOS7 自体は対応しているが、BlueOnyx の ISO が対応していないらしい。
isolinux で作られていて /isolinux/isolinux.cfg を読んでメニューを出したいが grub2-bhyve は対応していない。
出せないメニュー
(cd0)/isolinux/isolinux.cfg から埋めこむ
(cd0)/isolinux/isolinux.cfg から、埋めこむ選択肢の append 辺りを参考に
grub_install0="linux (cd0)/isolinux/vmlinuz inst.ks=hd:LABEL=BlueOnyx-5209R-x86_64:/ks/kick_self.cfg initrd=initrd.img inst.stage2=hd:LABEL=BlueOnyx-5209R-x86_64 rd.live.check quiet net.ifnames=0 biosdevname=0"
grub_install1="initrd (cd0)/isolinux/initrd.img"
grub_install2="boot"
のように書く。
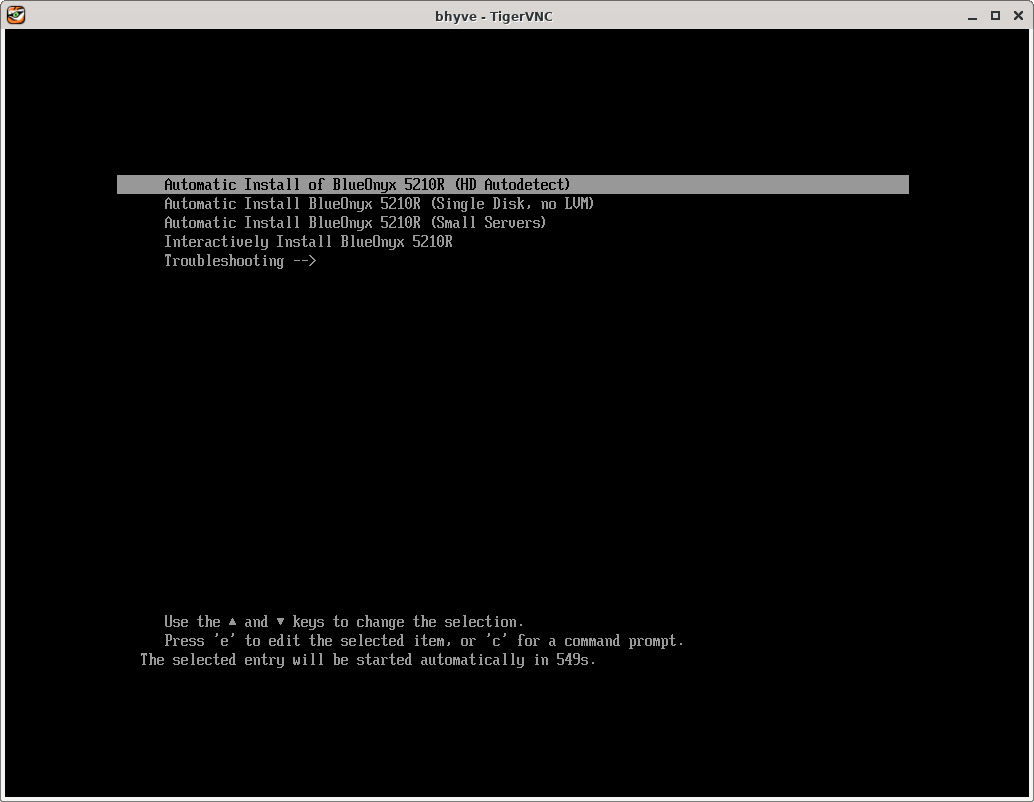
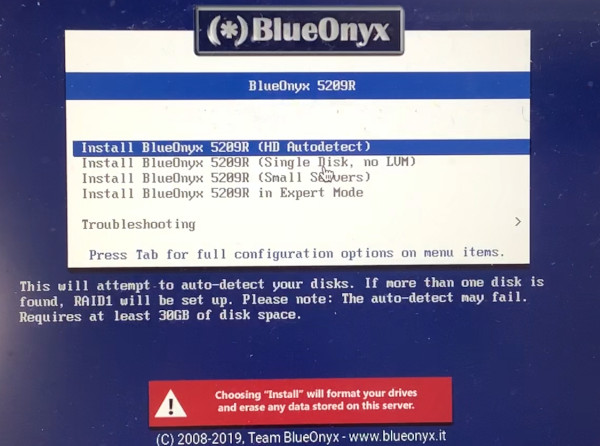
# (cd0)/isolinux/isolinux.cfg 抜粋
label linux
  menu label Install BlueOnyx 5209R (HD Autodetect)
  text help
  This will attempt to auto-detect your disks. If more than one disk is
  found, RAID1 will be set up. Please note: The auto-detect may fail.
  Requires at least 30GB of disk space.
  endtext
  kernel vmlinuz
  append inst.ks=hd:LABEL=BlueOnyx-5209R-x86_64:/ks/kickstart.cfg initrd=initrd.img inst.stage2=hd:LABEL=BlueOnyx-5209R-x86_64 rd.live.check quiet net.ifnames=0 biosdevname=0

label nolvm
  menu label Install BlueOnyx 5209R (Single Disk, no LVM)
  text help
  This will install BlueOnyx on the first disk it finds. LVM or RAID
  will not be activated. Please use this option if the 'HD Autodetect'
  option does not work for you. Requires at least 25GB of disk space.
  endtext
  kernel vmlinuz
  append inst.ks=hd:LABEL=BlueOnyx-5209R-x86_64:/ks/kick_nolvm.cfg initrd=initrd.img inst.stage2=hd:LABEL=BlueOnyx-5209R-x86_64 rd.live.check quiet net.ifnames=0 biosdevname=0

label small
  menu label Install BlueOnyx 5209R (Small Servers)
  text help
  This will install BlueOnyx with 'HD Autodetect' and a smaller
  partition layout than usual. Recommended for small servers.
  Requires at least 10GB of disk space in order to install.
  endtext
  kernel vmlinuz
  append inst.ks=hd:LABEL=BlueOnyx-5209R-x86_64:/ks/kick_small.cfg initrd=initrd.img inst.stage2=hd:LABEL=BlueOnyx-5209R-x86_64 rd.live.check quiet net.ifnames=0 biosdevname=0

label expert
  menu label Install BlueOnyx 5209R in Expert Mode
  text help
  This will allow you to install BlueOnyx 5209R using the interactive
  installer. You can also partition yourself. Be sure to mark the
  software group 'BlueOnyx' and use 'ext4' filesystem. Only
  recommended for advanced BlueOnyx users.
  endtext
  kernel vmlinuz
  append inst.ks=hd:LABEL=BlueOnyx-5209R-x86_64:/ks/kick_self.cfg initrd=initrd.img inst.stage2=hd:LABEL=BlueOnyx-5209R-x86_64 rd.live.check quiet net.ifnames=0 biosdevname=0
xfs
パーティションが xfs で作られてしまうと、grub2-bhyve が読めない。
BlueOnyx 的にも ext4 が推奨のようだが、上の expert の記述と /ks/kick*.cfg 内の記述が一致しておらず、意図が分からなかった。
少なくとも nolvm だと xfs で作られてしまい失敗、expert だと ext4 で作られて起動できることを確認した。
追記: https://www.blueonyx.it/news/257/15/BlueOnyx-5209R-XFS-file-system
text mode での制限
grub2-bhyve だと CUI の text mode しか起動できず、これだとパーティションを切る画面が出せない。
したがって ext4 で切れるかは /ks/kick*.cfg に依る。
インストール後
インストール後に yum update などをしてカーネルが上がると、ブート時の選択肢が増えるが
bhyve でも (hd0,msdos1)/grub2/grub.cfg からメニューを出すことはできているので
カーネルが上がっても問題ない。
別ルート
CentOS7 を入れてから BlueOnyx の rpm を入れる方法もある。
https://www.blueonyx.it/5209r-manual-install
これだと UEFI ブートして GUI mode で起動できるので、パーティションエディタも起動できるはず。
ただ 800-1200 RPMs 程度あるようだ。
その他
ブートとシャットダウンがとても速くて快適です。もちろんスナップショットも一瞬です。